


Yagi – Dimensions
I am always carrying my HT (Yaesu VX-7R) as a backup on my SOTA activations. It saved my butt on two occasions when high winds prevented me from setting up my vertical Buddipole. Since high winds are not unusual at higher elevations I was looking for a better antenna compared to the stock rubber-ducky for future activations. I found an antenna I really liked on Youtube, created by David/KD7MNI who was inspired by a design by Paul/KD5IVP. Paul even shared his plans online. I based my own plans on the info provided by David and Paul and after a week-end it was ready to test. A lightweight arrow-shaft houses the piano-wire for elements nicely but I was not happy with the dangling RG-8x… even wrapping it around the arrow-shaft made it awkward to transport… so I never actually took it to a summit until last week, when I activated Mt. Herman (WØC/FR-Ø63) with Steve/wGØAT.

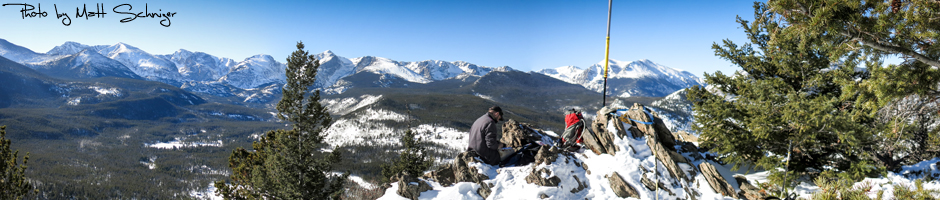
Yagi on Mt. Herman (photo by Steve/wGØAT)
On the summit I had a real problem with my Buddipole coax and had to rely on my 2m 3-element Yagi to be able to claim my points. So… did it work you ask? YES, it sure did… the furthest contact I made was with Ken/WB9QDL who was in Thornton in his car (~60 miles). Not that the distance is unusual for a 2m contact with 5W but we had the opportunity to compare the signal with Steve’s HT. According to Ken, my signal and audio quality was better than Steve’s HT with a 17″ flexible whip antenna.

Remains of a Yagi
Good enough for me. I decided to take the antenna on my double-activation of Lily Mtn. & Panorama Pk. to see what it is capable of. Unfortunately it never came to another test. The antenna was strapped to the outside of my backpack. The light-weight arrow-shaft broke apart during my ascent through the forested area to Lily Mountain without me noticing and I lost some of the piano-wires which were stored inside.
My Conclusion: It seems that the antenna was just too flimsy and not rugged enough for my purpose. Most trails around here start well below the treeline and there is always a part where I have to bush-whack through trees. The arrow shaft is too long to be stored in a backpack and thus needs to be strapped to the outside. Using another container to protect the antenna seems to defeat the purpose of having an ultra-light antenna. I guess it is time to try a tape-measure antenna next :)
Video of the antenna in action:
httpvh://www.youtube.com/watch?v=TeTrAPNo8tQ
If you would like to leave questions or comments, please do so through Youtube.
Check my other Yagi-Uda construction attempt.
![]() !! WARNING !! There are old mountaineers, and
bold mountaineers... there are no old-bold mountaineers.
Hiking and mountain climbing are potentially hazardous activities particularly in Colorado with its extreme elevations. I am not accepting responsibility for any death or injury resulting from activations based on my trip reports. Proper training, experience, and personal capability assessment is required - enjoy!
!! WARNING !! There are old mountaineers, and
bold mountaineers... there are no old-bold mountaineers.
Hiking and mountain climbing are potentially hazardous activities particularly in Colorado with its extreme elevations. I am not accepting responsibility for any death or injury resulting from activations based on my trip reports. Proper training, experience, and personal capability assessment is required - enjoy!
[..YouTube..] Gotta really hit SOTA hard this year. Nice vid!
Gotta really hit SOTA hard this year. Nice vid!
[..YouTube..] Nice vid. You should post more about the construction of the yagi since you mention/feature it so prominently.
Nice vid. You should post more about the construction of the yagi since you
mention/feature it so prominently.
[..YouTube..] Hello Matt. The antenna looks very interesting. Thanks for the information. 73 de Manfred
Hello Matt. The antenna looks very interesting. Thanks for the information.
73 de Manfred
[..YouTube..] Excellent video it gives ideas to construct a light YAGI for 144Mhz TNX 73’s John 14FDX058
Excellent video it gives ideas to construct a light YAGI for 144Mhz TNX
73’s John 14FDX058
[..YouTube..] Great view.
Great view.
[..YouTube..] References to the construction can be found in the blog post mentioned.
References to the construction can be found in the blog post mentioned.
[..YouTube..] Hi Fred, it’s certainly lightweight – perfect for your activations in Germany/Austria. Thanks for your comment.
Hi Fred, it’s certainly lightweight – perfect for your activations in
Germany/Austria. Thanks for your comment.
[..YouTube..] Looking forward chasing you. Thanks for your comment. 73
Looking forward chasing you. Thanks for your comment. 73
I read your page, sorry to see the arrow shaft couldn’t hold up, but there
is a solution to making your arrow shaft collapsible, just cut the arrow
shaft between the holes for the piano wires and add some broadhead inserts
on every connection and superglue some short # 8×24 all thread for each
connection on one side and leave the other free. for the wire, just roll it
up in a coil and use small velcro or just tape to keep it there. piano wire
will just spring back straight when released.
Now that looks excellent frm M6HPL
COM UM RADIO DESSE POTENTE E NESSA ALTURA ATE COM UMA CHAVE DE FENDA ELE
SINTONIZARIA QUALQUER FREQUENCIA.
Deutsch, oder?
hi. where are you from? i’m in vietnamese
write soon